Setup the Project
Git Setup
Install Git on your development environment.
Clone the project.
git clone git@github.com:CraftsmenLtd/BloodConnect.git
Open the project in terminal/IDE.
Execute to change the git hooks to .githooks directory.
git config core.hooksPath .githooks
Make the directory executable
chmod +x .githooks/*
Pre-requisites
Install Docker on your development environment
- Install Make
MacOS
brew install make gnu
Linux Use whatever your package manager (apt, dnf, pacman, yum) is to install the packages. For example with Debian
apt install make gnu
First Time Install
Firstly familiarize yourself with terminologies in this project. There are a few to keep in mind.
Concept |
Keyword |
Description |
Example |
|---|---|---|---|
Deployment Environment Group |
DEPLOYMENT_ENVIRONMENT_GROUP |
This denotes the type of environment you will be deploying to in our infrastructure, allowing access to all resources related to that environment group, e.g., GitHub secrets. |
localstack|dev|stage|prod |
Deployment Environment |
DEPLOYMENT_ENVIRONMENT |
This denotes the name of the environment that your deployment will be associated with. |
branch-name|ticket-name|your-name|stage|prod |
Branch Deployment |
Branch Name |
Used as DEPLOYMENT_ENVIRONMENT along with DEPLOYMENT_ENVIRONMENT_GROUP set to dev to deploy a standalone app. |
branch-name |
The project expects you to use localstack and docker as a development environment. You can choose one of two ways to start developing.
Dev Container: This is where you’re not expected to require any setup beyond aws access in your terminal and docker along with make.
Container: You are not expected to have any binaries for writing code, compiling code or packaging code but you will need binaries to get lint support and other integration with your IDE of choice.
Pipeline: This is the easiest yet the most time consuming process because here you will have to commit your code and run the branch deploy pipeline.
Native: This is where you will have to setup all necessary binaries related to the project. We will not go into the details of this.
Warning
Check out into a new branch please
Dev Container
Read more about dev containers here.
Warning
Dev containers and localstack are still not working together. Therefore commands make docker calls in order to setup localstack will not work. For example localstack-start will not work from the dev containers cli.
Make sure you have Dev Containers (ms-vscode-remote.remote-containers) installed on your vscode.
Warning
This guide assumes you will use dev containers to deploy a branch into aws.
Before starting a dev container, you must ensure your aws access is prepared such that dev container can have secure access to it. Assuming access for bloodconnect works from your cli; run the following command to create an env file from the project root.
aws sts assume-role \
--role-arn arn:aws:iam::<bloodconnect aws account id>:role/GitHubActionsAndDevRole \
--role-session-name <a random session name> \
--query "Credentials.[AccessKeyId,SecretAccessKey,SessionToken]" \
--output text | \
awk '{
   printf "AWS_ACCESS_KEY_ID=%s\n", $1;
   printf "AWS_SECRET_ACCESS_KEY=%s\n", $2;
   printf "AWS_SESSION_TOKEN=%s\n", $3;
}' | \
while read -r line; do
   varname=$(echo "$line" | cut -d= -f1)
   value=$(echo "$line" | cut -d= -f2-)
   if grep -q "^${varname}=" .devcontainer/.env; then
      sed -i "s|^${varname}=.*|${varname}=${value}|" .devcontainer/.env
   else
      echo "${varname}=${value}" >> .devcontainer/.env
   fi
   sed -i "s|^${varname}=.*|${varname}=${value}|" .devcontainer/.env
done
Warning
The above role is maintained in this repo: https://github.com/CraftsmenLtd/Bloodconnect-oidc
This will create a simple .env file with required aws environment variables. You might want to add any additional variables required for development here as well. Some might already have defaults set in our makefile. Examples of variable you might want to set:
To set variables for terraform; use the deployment/aws/terraform/.env file. Example variables:
To set variables for mobile development; use the clients/mobile/.env file. Example variables:
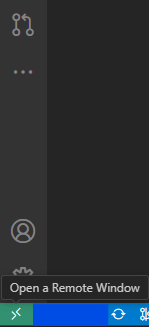
Now that that is done; you can follow the screenshots below to start dev containers. Click on the remote window icon on the bottom left of your vscode window.
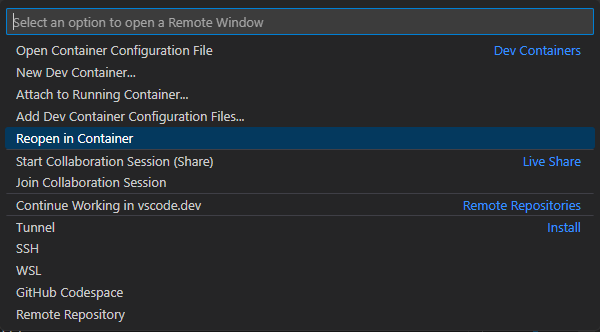
Now from the options select Reopen in Container.
On first setup it might take awhile since it will build the image. You may be asked to approve github fingerprint setup, please select yes so that you can use git from dev containers.

Now you are ready to run commands. Keep in mind that you are inside the dev container; meaning you can run almost all commands in our makefile except for those that need docker cli. Another thing to be aware of is that you can not run commands with the run-command prefix as you are already inside the container.
Prepare your code for deployment.
make prep-dev
This will install all packages, build all node lambdas and zip them for deployment. You can run this every time you’ve made changes and you want to deploy. Next you need to do the actual deployment.
make deploy-dev-branch
And thats it. You will have all the bells and whistle of your IDE without having to mess around with any binaries.
Warning
If your aws credentials expire, you’ll need to update the .devcontainer/.env file with the new credentials. You can chose to rebuild the container if you want the environment variables available in your container bash terminal. You can also just keep using the make file as is since on every run of the makefile, we import the .devcontainer/.env file.
Container
This works very similar to how the previous setup works and our pipelines work the same way except for a few differences.
All commands except start-dev and run-dev must be prefixed with run-command. run-command essentially executes the make target inside our prebuilt development container.
Assuming you have aws access and localstack access, go ahead and run
export $(printf "AWS_ACCESS_KEY_ID=%s AWS_SECRET_ACCESS_KEY=%s AWS_SESSION_TOKEN=%s" \
$(aws sts assume-role \
--role-arn arn:aws:iam::<bloodconnect aws account id>:role/GitHubActionsAndDevRole \
--role-session-name <a random session name> \
--query "Credentials.[AccessKeyId,SecretAccessKey,SessionToken]" \
--output text))

export LOCALSTACK_AUTH_TOKEN=<your localstack auth token>
This will export the aws variables into your environment.
make start-dev
Which will do everything required in order to get a fully working localstack deployment running. Every time you want to check your changes, you can just run
make run-dev
If you want to run a specific command from the makefile; use the run-command prefix. Note that this doesn’t apply to prep-dev, start-dev localstack-start or run-dev.
If you want to deploy into aws with this method, you can still run:
make deploy-dev-branch
Pipeline
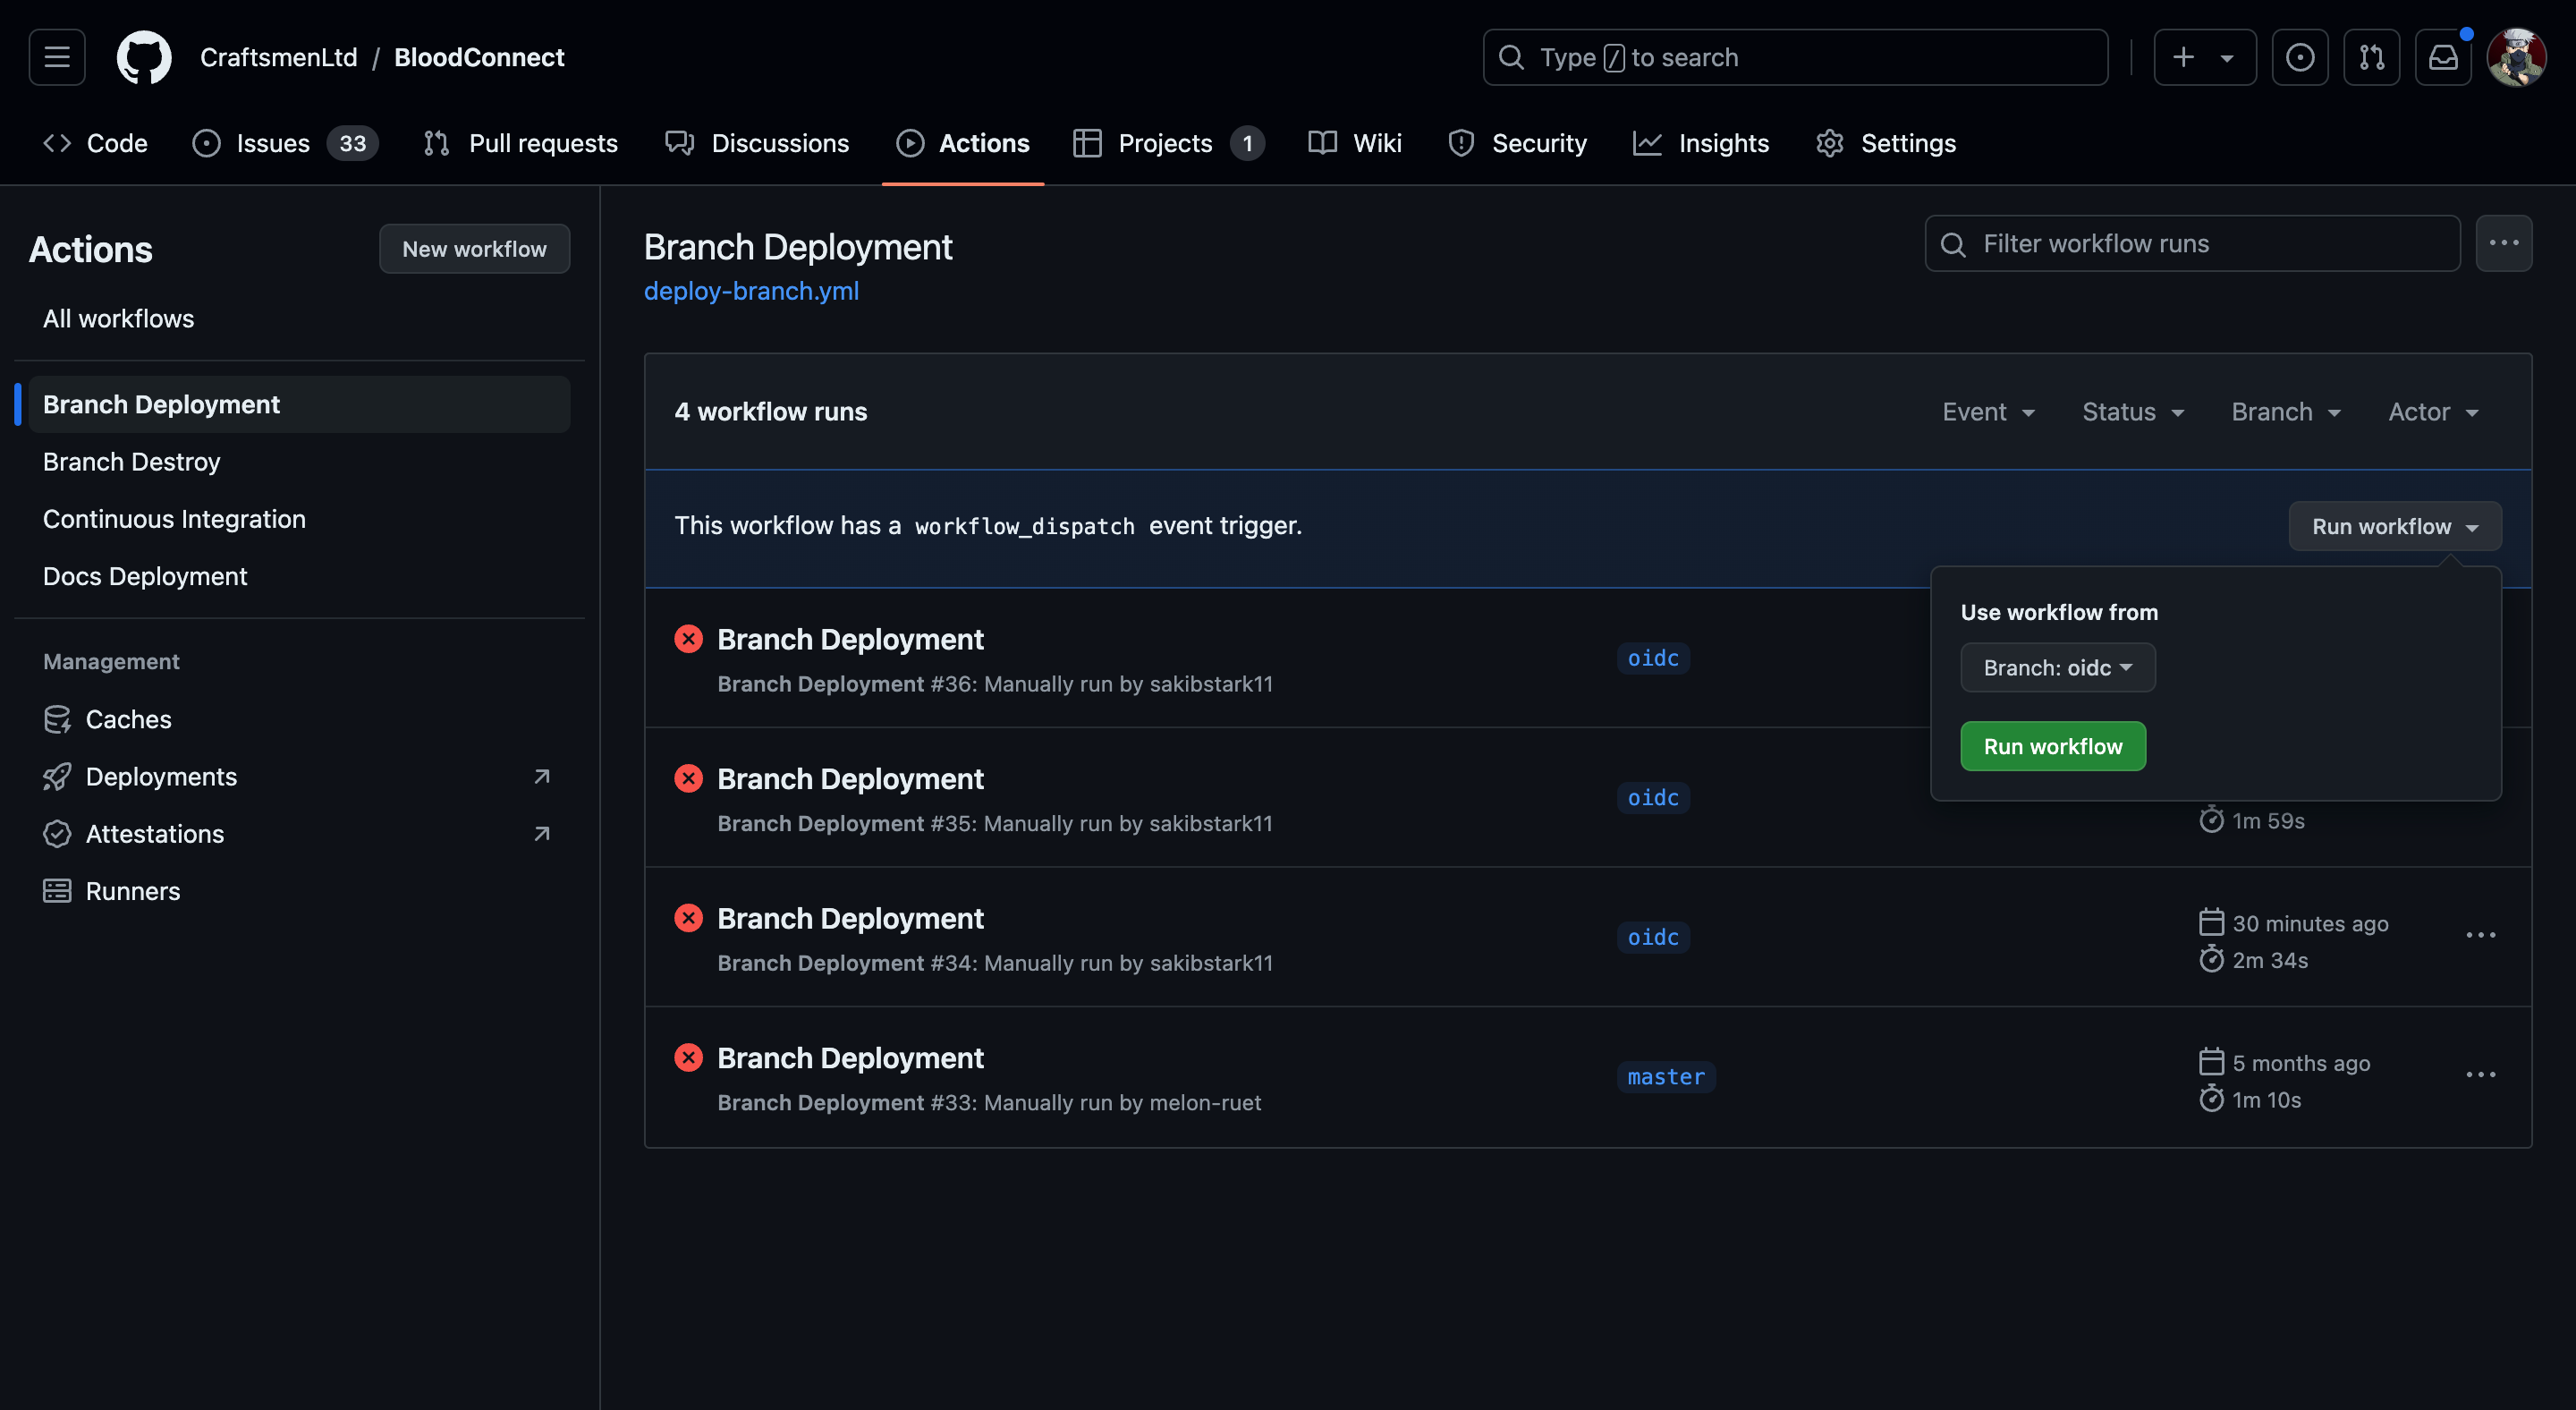
The hassle free deployment strategy. Go onto github actions herehttps://github.com/CraftsmenLtd/BloodConnect/actions/workflows/deploy-branch.yml. And do the following:
Thats all for now. Have fun.
AI-Assisted Development (AIDLC)
This project uses the AI-DLC workflow — an adaptive, intent-driven software development methodology from AWS Labs.
Rule details live in .aidlc-rule-details/ at the project root.
Note
Currently configured for Claude Code only. Contributions to add support for other tools (Cursor, Cline, GitHub Copilot, Amazon Q, Kiro) are welcome. See aidlc-workflows for setup guides per tool.
Verify Setup (Claude Code)
Run
/configto confirmCLAUDE.mdis loaded.Ask the assistant:
"What instructions are currently active in this project?"
A correctly configured session will describe the AIDLC adaptive workflow with Inception, Construction, and Operations phases.
Starting the Workflow
Begin any development request with:
"Using AI-DLC, ..."
This activates the full structured workflow automatically.